Assets are the computers, equipment, and other devices that you perform work on. You can add your assets into Incident to track the work done and costs related to those assets. Note: If you are importing a spreadsheet that was provided by Dude Solutions initially proceed to the Importing Assets section below.
Preparing to Import New Assets or Updating Existing Assets
You can easily add new Assets or update existing Assets in your account by using the import tool. Running the Master List report to Excel gives you a spreadsheet that you can fill out to use in the import.
- From the Home page, click on Asset Inventories in the Information & Analysis section on the right side of the page.
- Hover over the Shortcuts menu at the top of the screen and click Report.

- In Step 1, select All from the pull-down menu.
- For updating existing Assets, you can make selections in Steps 3 - 10 to narrow your list of assets for import.
- In Step 13, select Master List.
- In Step 14, select Excel Spreadsheet.
- In Step 15, click Print This.
- The report will open in another window for you to view and save. If the report does not open, it is possible that a pop-up blocker is preventing it from opening. You can try holding down the Ctrl + Alt keys on your keyboard while you click Print This to try to bypass the blocker.
Now that you have your Excel file, you should save it on your computer to your desktop. This Master List will have all of the correct column headers from Incident and will import back into your account with little to no validation required.
*Note: If you do not have Assets in your inventory, you can use this report to get a blank Excel template for importing new assets into your account.
Importing Assets
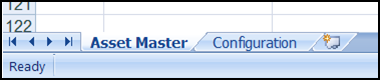
Once you have added new assets and/or updated existing asset records on the spreadsheet, save the file to your computer. Make a note of the sheet title at the bottom of your spreadsheet. You will need to enter that information when importing. By default the sheet name will be Asset Master on the Master List report, unless you have renamed it.
- From the home page, click on Asset Inventories in the Information & Analysis section on the right side of the page.
- Hover over the Related Links menu and click Import.
- In Step 1, browse your computer and locate the file to use for the import. Make sure your file format is .xml, .csv, or .xls.
- In Step 2, make sure to type in the correct Excel sheet name. You may need to reference the spreadsheet prior to importing. Remember that the default sheet name on the report is Asset Master.
- Click Upload.

Validating Data
After clicking the Upload button, the next screen will allow you to validate the fields. In most instances, you will be able to scroll to the bottom of the screen and click Validate Now. You will only need to validate data if you are importing your own spreadsheet where the column headings do not match what is already defined in Incident. If you do not need to validate date, you are almost done!
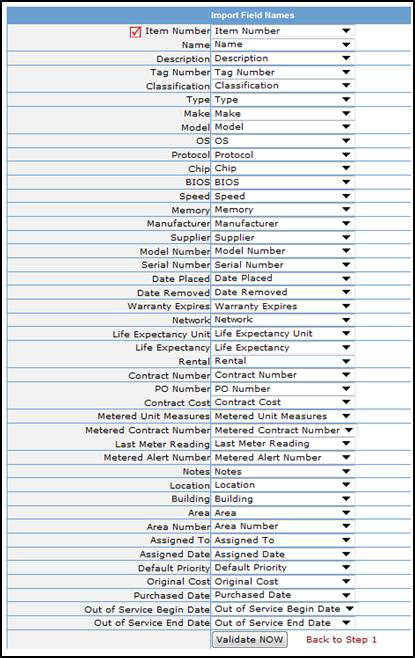
When validating data is necessary, each of the drop-down boxes on this page allow you to indicate what you titled the source file. For example, if you have Item # in your source, please match it with the Item Number field in Incident. Here are some rules to remember:
- The item number is the key searchable field. It must be a unique identifier and it must exist in your source file.
- If you leave an item blank in your source file, then it will be displayed as a blank field in Incident.
- Every time you perform an import, make sure that you use the same source file and column headings.
- The following fields must exist in Incident in the Account Setup section and must be spelled correctly in your source file before you validate your data:
- Location
- Building
- Area
- Manufacturers
- Suppliers
- Classifications
- Types
- Assigned To - An email address will need to be used in this column of the spreadsheet.
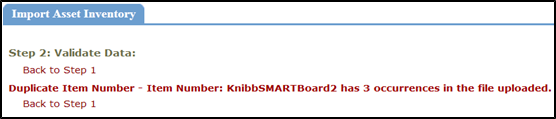
*Note: If you click the Validate Now button and there are problems with any of the fields listed above, you will receive an error message. The error will indicate the problem that will need to be corrected before proceeding. Below is an example of the type of message you may receive:
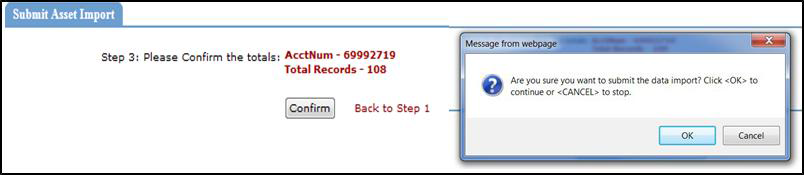
Once errors have been fixed in the source file, you can import the spreadsheet again and validate the data. The final steps will be to click the Confirm button and then click OK to submit the data.
The import is now complete and will be sent to a queue to upload after midnight.
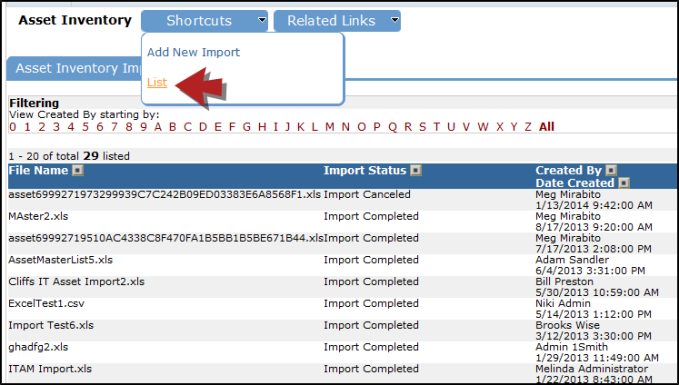
Viewing Asset Imports
If you would like to see any imports that have been performed in your account, or any that are pending, hover over the Shortcuts menu on the Asset Import page and click List.